Windows Login Agent
Getting Started
SecurEnvoy assumes that organisations have already followed the instructions on how to set up and install the Windows Login Agent in a standalone or mass deployment state.
Login Agent machines will be added into the SecurEnvoy Access Management Platform once the target machine has triggered the Login UI, this can be done in the form of signing out and signing back into a target machine, or restarting the target machine.
The expected behaviour is that the login flow has not changed and is still using the Microsoft Generic Filter only for logging into the target machine, but once the Login UI has been triggered the target machine will be added into the Windows Login Agent tab of the SecurEnvoy Access Management Platform.
Once target machines have been registered in the SecurEnvoy Access Management Platform, Organisations will have the opportunity to customise the login flow for the Login Agents in a mass provisioning state, or a per-machine state.
Machine Details
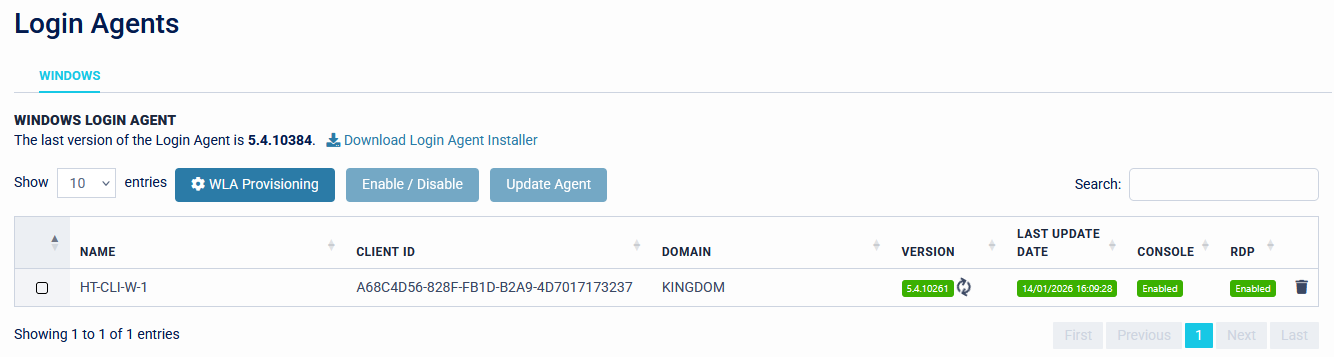
Each Target Machine will be imported into the SecurEnvoy Access Management Platform, with a Machine Name, Domain and Unique Client Identifier (ID).
Please note that machines that are part of a workgroup and are not domain joined, can also be added into the SecurEnvoy Access Management Platform. The domain for these machines will be added as "WORKGROUP". When using Workgroup machines, Organisations must be aware that users will need to be created in both the Local Workgroup and the SecurEnvoy Access Management Platform manually, and updated manually.


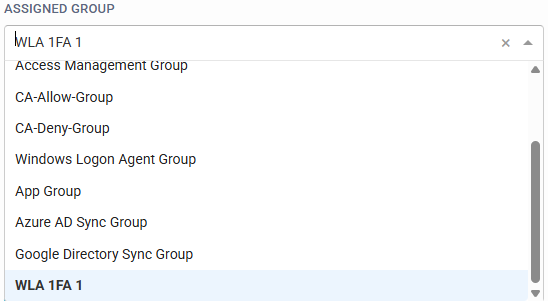
Assigned Group / Group Type
Certain use cases require organisations to have bypass groups, to allow users to authenticate to the Login Agents without an extra step of authentication. This is where the Assigned Group / Group Type options come in perfectly.
This feature is OPTIONAL, and is not a mandatory requirement to use the login agent.
Assigned Group will allow organisations to specify a group that should be targeted for the group membership logic. This can be a synchronised group from a directory or a group made in the SecurEnvoy Access Management Platform's Universal Directory (UD Group).
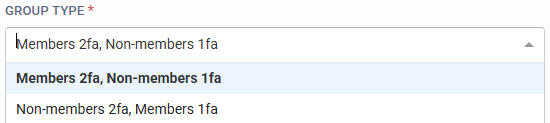
Group Type allows organisations to choose an authentication flow.
- Members 2fa, Non-members 1fa: This will enforce 2FA on all members of the target group, and allow non-members of the target group to sign in with their password only.
- Non-members 2fa, Members 1fa: This will enforce 2FA on all non-members of the target group, and allow members of the target group to sign in with their password only.
Last Logged-In User Mode
This option allows organisations to customise the behaviour of the "Last Logged-On User" feature on target machines.
- Hide: This will hide the last logged-in username.
- Show: This will show the last logged-in username.
- Windows Default Configuration - This will use the existing Windows configuration for the last logged-in username on the target machine.

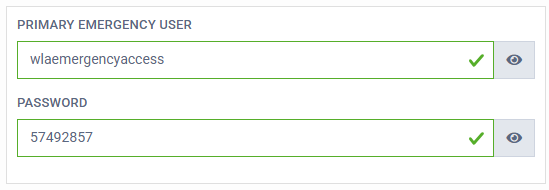
Emergency Users
SecurEnvoy Recommends customers use a Local Account for the Emergency Users, so that they are local to the target machine, and don't have a reliance on an LDAP Directory for authentication, such as Microsoft Active Directory.
SecurEnvoy's Login Agents allow configuring Emergency Access users in case there is a scenario where a target machine cannot contact the SecurEnvoy Access Management Platform for authentication. The credentials are stored encrypted within the local registry of the machine. The Emergency Users also have an Emergency Access Password, which allows for a static alphanumeric passcode to be set up, for a secondary factor of authentication, even when the machine is in an offline state.
- Primary Emergency User: This is the username of the local user account.
- Password: This is the Emergency Access Password for the local user account, configured in the SecurEnvoy Access Management platform’s "Password" field for the Emergency User on the target machine.
Expected flow:
- User is in an offline state and cannot contact the SecurEnvoy Access Management Platform for Authentication.
- Local Username and Password can be entered for the Emergency Users.
- SecurEnvoy checks if there is reachability to the platform.
- If this is not reachable, the Emergency Access Password is prompted for the Emergency User.
Since the SecurEnvoy Windows Login Agent validates only the username and MFA—not the password—LAPS tools can be used for Emergency Users. Password validation is handled by the Microsoft Generic Credential Provider Filter before the request is passed onto SecurEnvoy for secondary authentication.
Please note that Emergency Users are only available when the target machine cannot connect to the SecurEnvoy Access Management Platform. If the platform is reachable from the target machine, then the Emergency Users cannot be used for authentication, as these Emergency Users are reserved for Emergency Access reasons only, such as complete loss of network connectivity.
Enforce MFA
The Enforce MFA option can be applied on a per-machine basis to require multi-factor authentication at all times. When this toggle is enabled, only users who have access to the machine and a secondary authentication method configured on the SecurEnvoy Access Management platform will be able to log in. Users without a configured secondary method will be denied access to the target machine.
Organisations can also enforce this setting globally across all Windows Login Agent machines using the Conditional Access Policy Engine. However, this option is intended for organisations that prefer to manage MFA enforcement on a per-machine basis, allowing flexibility for scenarios where MFA may not be required on specific target machines.

Enable / Disable Console & RDP Protection, Unlock UI & Logon UI
SecurEnvoy Windows Login Agent can protect both Console and Remote Desktop Protocol (RDP) access on port 3389. Organisations can choose to secure both connection types or limit it to either Console or RDP. The Agent also offers organisations options to tailor whether to protect the Logon UI and/or Lock screen UI in a Console or RDP scenario for added flexibility.
A key benefit of the Login Agent is its ability to check for the latest configuration from the platform at the start of each authentication attempt. If organisations need to temporarily disable the Login Agent protection, they can do so by turning off Console/RDP protection or Logon/Lock screen protection for the specific machine in the central administration portal, then re-triggering the login or lock screen interface.


Offline Support
Offline support is available on the Login Agent for organisations using a Smartphone Software Token (such as SecurEnvoy Mobile or a Third-Party Authenticator), or an OATH TOTP Hardware Token. This is a global setting that enables offline mode for all users, allowing them to log in to target machines with MFA even when network connectivity is unavailable.
Users are able to benefit from the offline method, after successfully logging into the machine in an online state. Once a successful online authentication to the target machine has occurred, SecurEnvoy will write the Users authentication data encrypted to the Local Registry of the Machine under Computer\HKEY_LOCAL_MACHINE\SOFTWARE\XCP\Offline.
The Offline Mode for the Windows Login Agent will only work for users who have signed into the target machine successfully when the SecurEnvoy Credential Provider Filter has been enabled. As this will write the authentication data to the local registry of the target machine. Any user who has not done this and tries to sign in, in an offline state, will not be able to sign in.

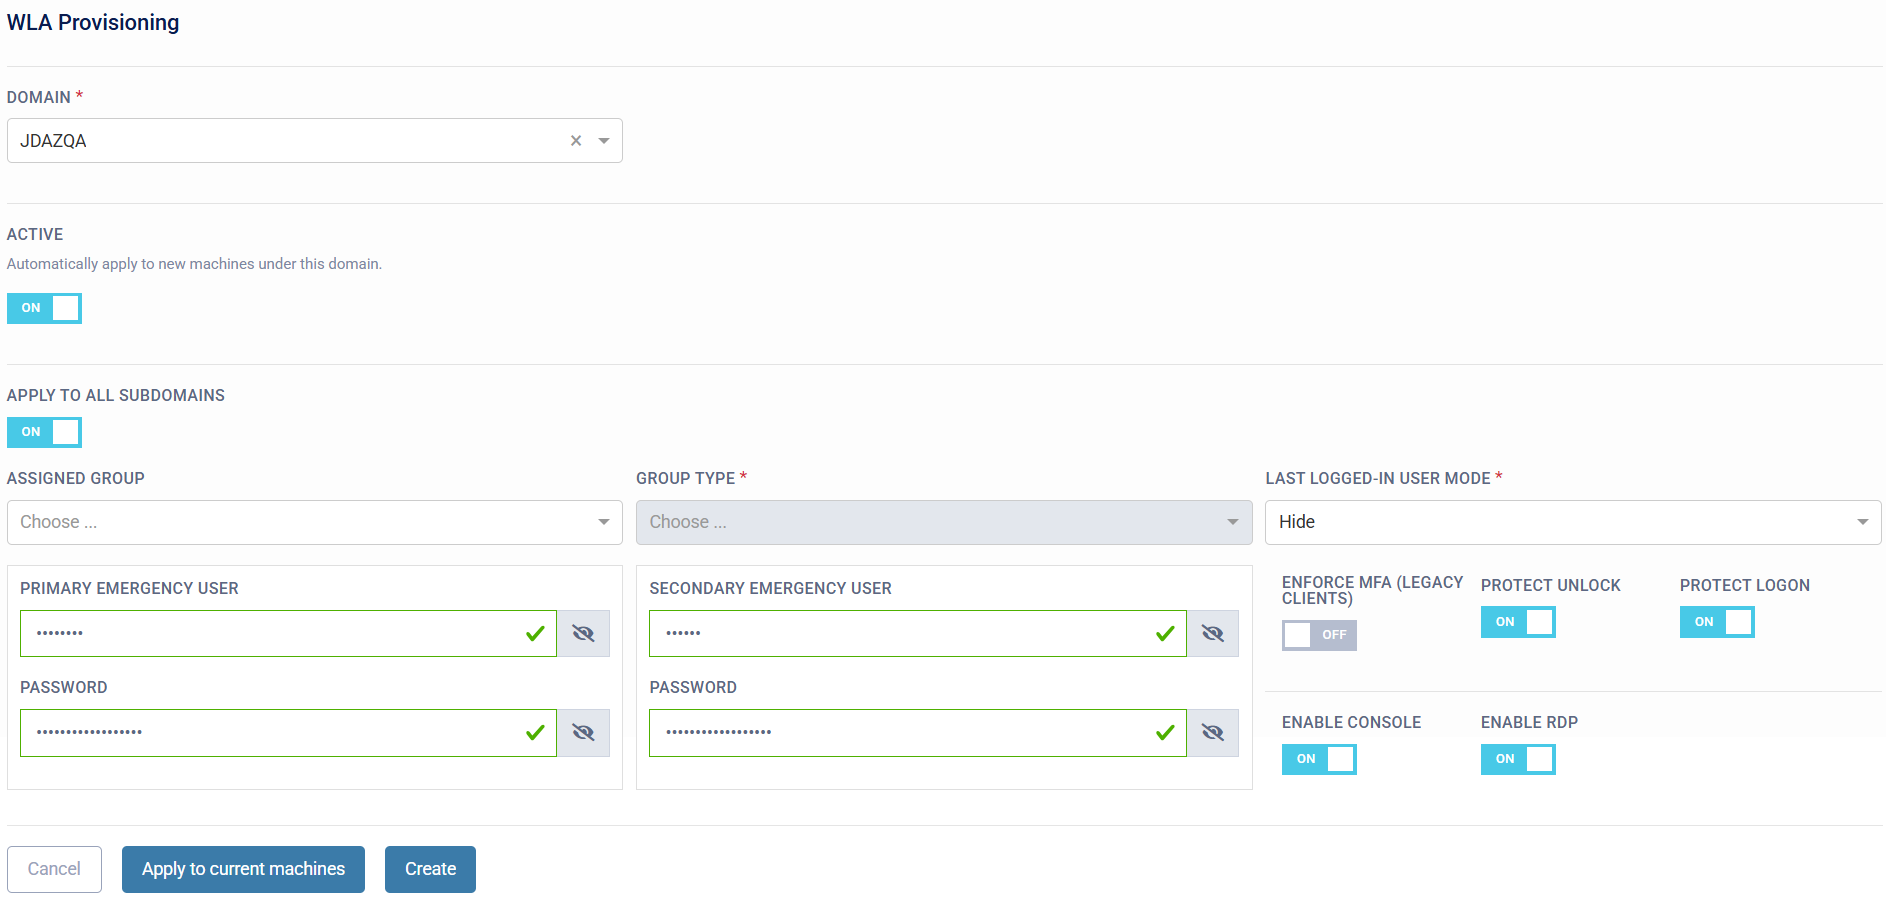
WLA Provisioning
The WLA Provisioning allows deploying the Login Agent to multiple machines in bulk. Organisations can specify a Domain and the option to "Apply to All Subdomains" that the Provisioning configuration should apply to. The specified configuration will then be provisioned to all machines registered on the SecurEnvoy Access Management Platform at the time, who have the specified Domain and Sub-domain (if the "Apply to All Subdomains" option has been enabled). Automation options are also available, in a scenario where organisations wish to apply the saved configuration to any new machines that are registered to the Access Management Platform under the configured domain.
Updating Windows Login Agent Clients (Central Update Service)
Updating Windows Login Agent Clients is a seamless task for Administrators with the Central Updating Process. The Windows Login Agent (V5.3 and above) includes a Windows Service that enables organisations to update supported Windows Clients and Servers centrally from the Administration Console. This provides organisations with an efficient updating process from a centralised platform, and eliminates the task of manually updating agents when new updates are available.
SecurEnvoy adopts the Microsoft Active Support lifecycle for Windows OS Support. If Microsoft still actively supports the OS that organisations wish to use, then SecurEnvoy will also support this.

The Update Service can be located within Windows Services under the name "SecurEnvoy.WlaAgentAutoUpdate".
![]()
Windows Login Agent Central Updating Example
The target machine is currently running V5.3.9917 of the SecurEnvoy Windows Login Agent. A newer version of the Agent (V5.3.9919) is available for installation. To update the machine(s) centrally from the Administration Console, specify the machine(s) that require updating to the newer version of the Agent, then press the "Update Agent" button.

The Central Update feature allows organisations both options for upgrading and downgrading. The aim of this example is to upgrade the agent to the latest available version, therefore the latest version will be specified. Once the desired version is specified, press "Submit" to begin the update process.
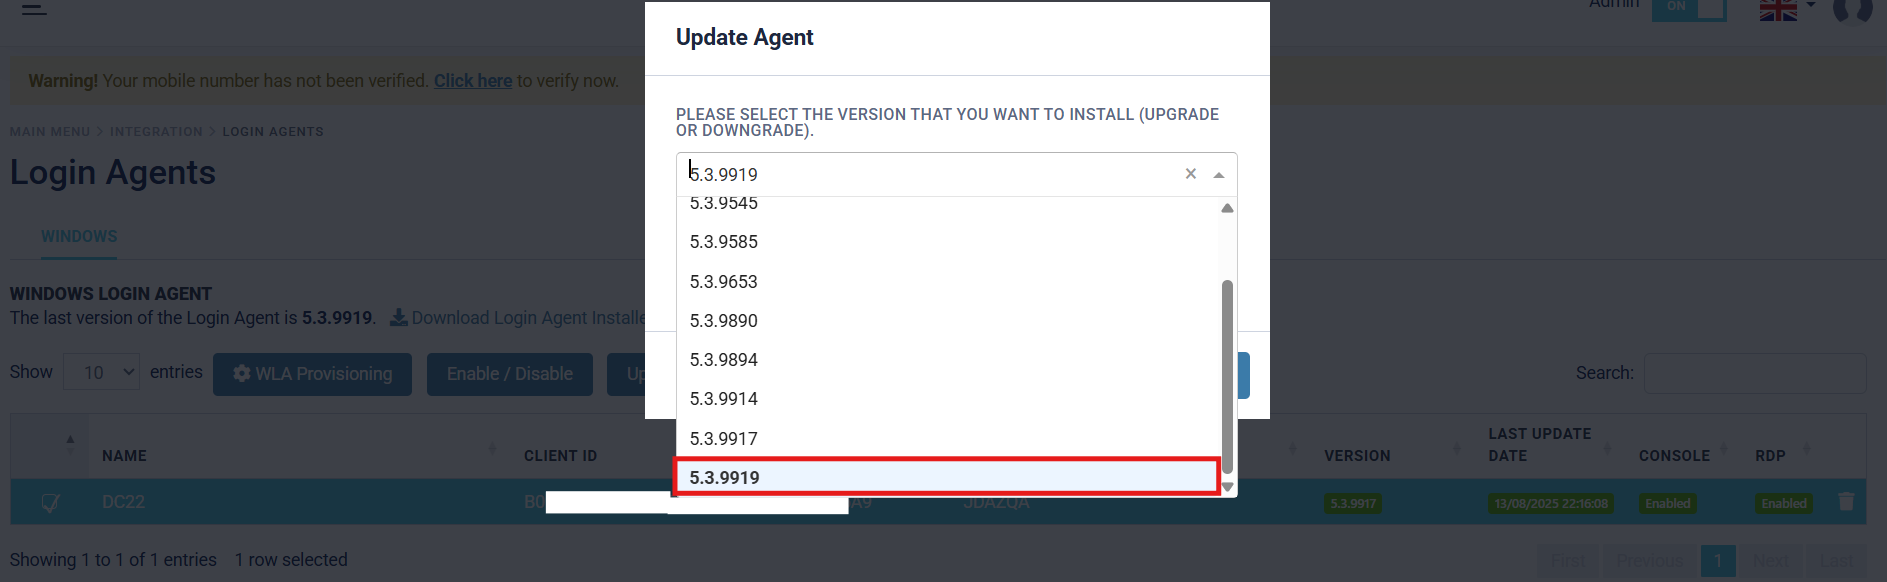
The update package will now be sent to the specified target machine(s) for updating. A "loading circle" icon will be displayed next to the client "Version", to show that the update is currently in progress. Updates typically take between 30-60 seconds, but can take up to 5 minutes.
In order to update the target machine successfully, the machine must be in an active state. If the machine is not in an active state, the update service will be polled until the machine is in an active state. Once the machine is active, the update will be performed.

The update is complete, and the client "Version" is also updated to reflect the new version that the target machine is now running. This feature allows organisation Administrators to update Windows clients and servers running the SecurEnvoy Windows Login Agent in a simple and efficient process, with minimal interaction.
